Integration guide SMS Zapier plugin
This integration guide will show you how to connect smsmode© to your Zapier-referenced application. You can easily integrate this SMS automation in less than 10 minutes by Next this step-by-step tutorial.
For general information on using Zapier, please consult the Zapier product sheet here.
The Zapier solution
The Zapier application connection service lets you numerous combination possibilities between the 1,000 or so applications currently available on the platform and smsmode©. Only prerequisites : have a Zapier account and a smsmode account©.
In the Next guide, we will show you the various steps to follow in order to create your first "Zap", i.e. automatically send an SMS with our smsmode service.©in response to a trigger from another system.
You need a smsmode© customer account to be able to create zaps with our platform and automate the sending of SMS. Creating a customer account is free and without obligation.
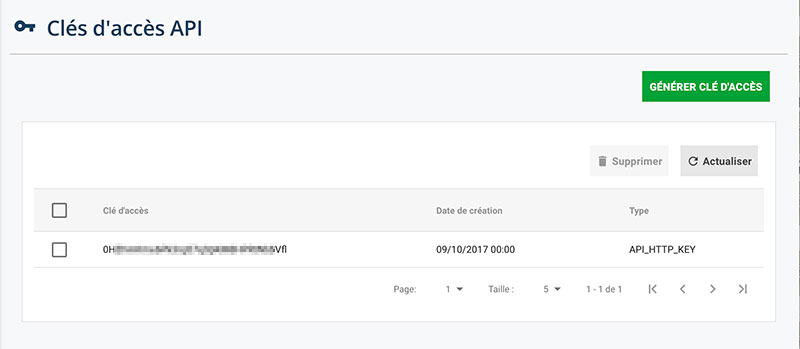
To connect smsmode© to Zapier, you'll need an API key.
Go to the Parameters > API access keys.
Click on the " Generate API access key " button and save the series of characters generated.
Step 1:
Create an smsmode account©
Step 2:
Create a Zapier account
You must register and log in to Zapier on this registration page.
The first 100 shares are free.
Step 3:
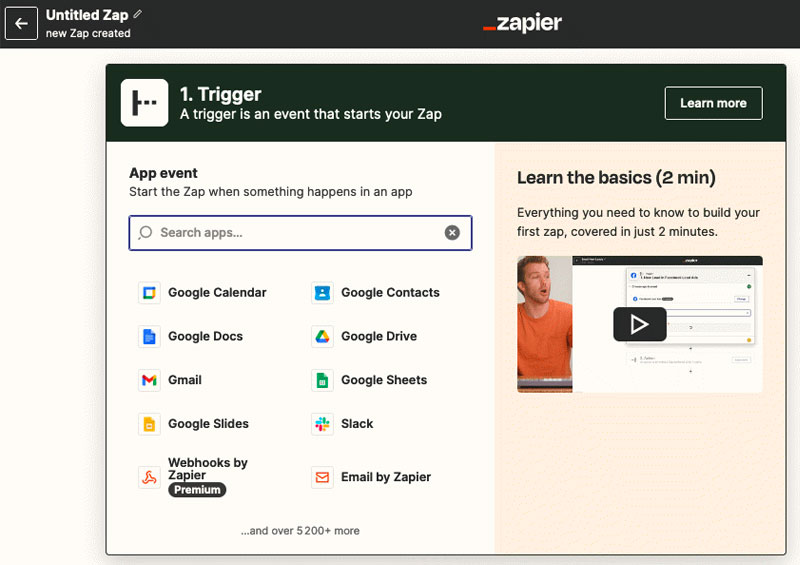
Creating your first Zap
To create your first Zap, click on the button:

Define trigger
Select application you wish to connect to smsmode©Google Calendar in our case.
Choose the event that should trigger the SMS sending action (for our example, we've selected "Event Start"). Then click on Continue.

Follow the instructions for connecting to your trigger application, and set the trigger options (optional, depending on the application). In the case of Google Calendaryou can choose which types of events will trigger the action, and fine-tune the trigger time.
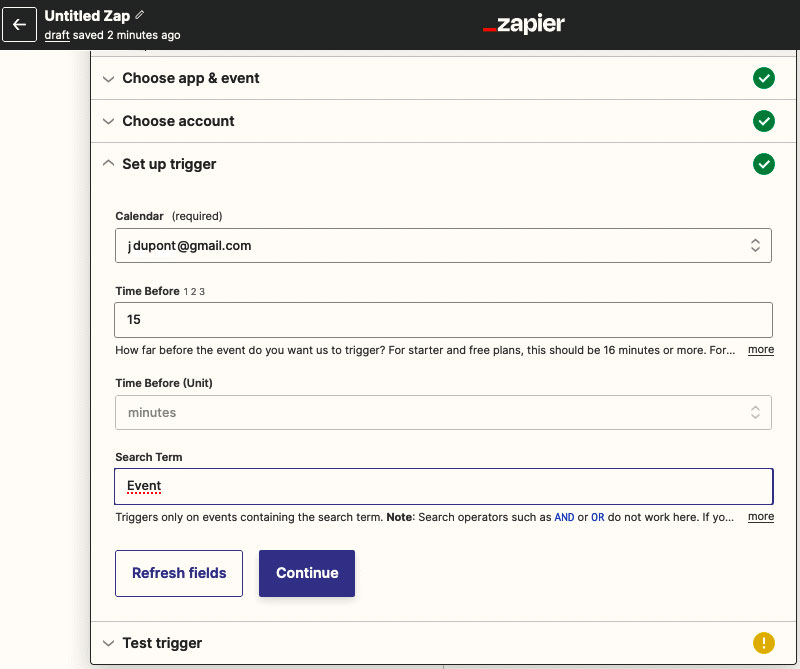
You can then test the trigger.
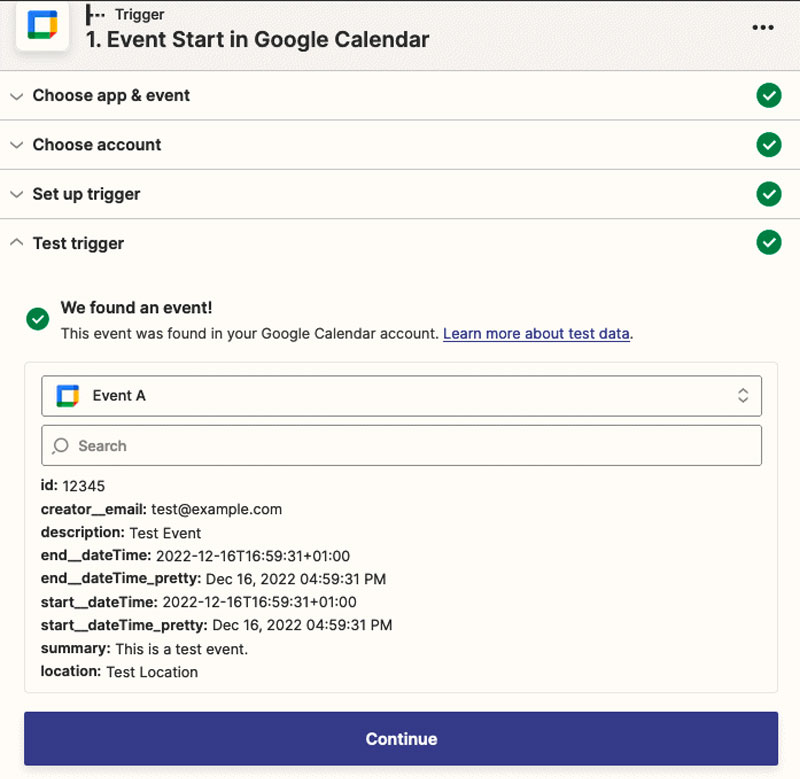
Congratulations! Your trigger is correctly set.
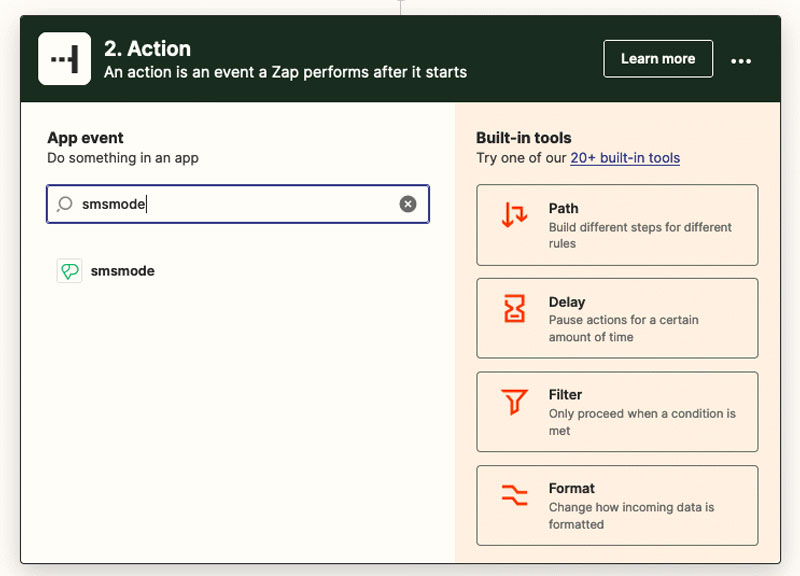
The next step is to configure the action, in our case sending SMS via smsmode©.
Choose smsmode© as an "action" application
Select our application by performing a search. Press "continue" to validate this step.
Choose the SMS sending action by selecting "Send Message". Click on "continue".
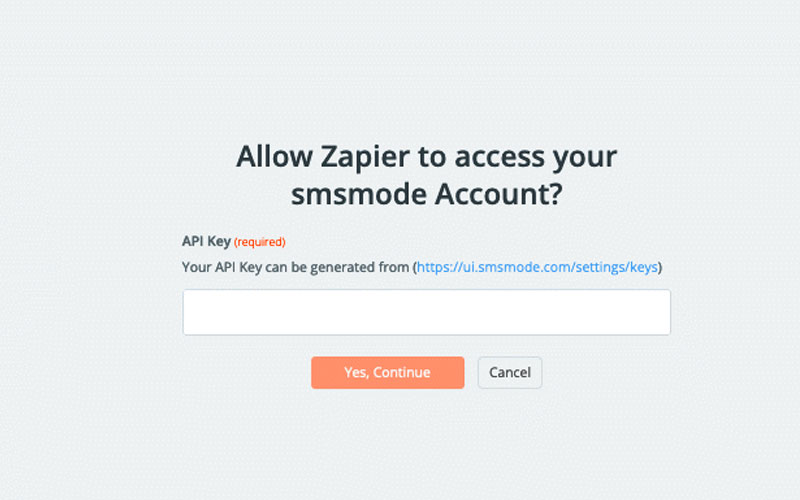
Access the smsmode© account configuration by selecting "smsmode© FirstTest" then "Connect a new account".
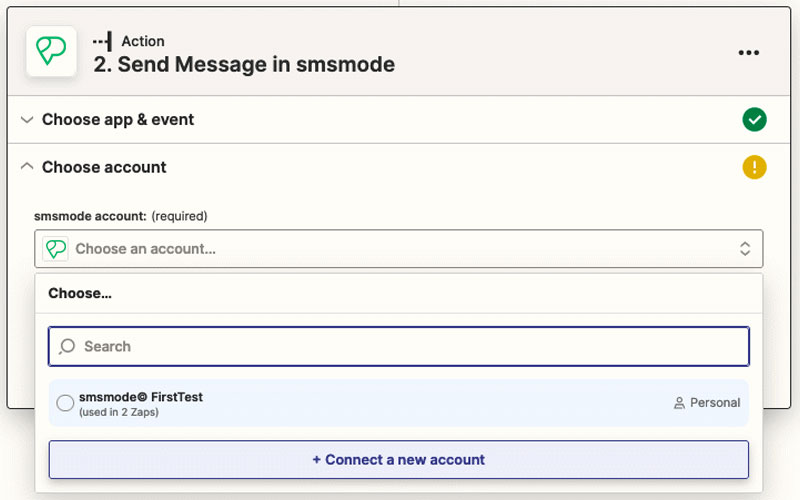
Login to your account smsmode© to the Zapier application with the string "API access key"created previously on your smsmode customer account© (see step 1). The connection is tested.
Once this step has been completed, click on " Yes, Continue ".
REMINDER ApiKey smsmode© can be accessed at url : https://ui.smsmode.com/settings/keys
Set the content of your SMS message. The fields (see list and image below) can contain manually entered text and/or variable variable mailing parameters. The following fields are available:
- Message (Required)
Define the body of the SMS you wish to send.
You can personalize the message by clicking on the icon on the right and defining a field, for example: Hello [first name].
ATTENTION: if your message exceeds 150 characters, 2 credits will be deducted for each message sent. SMS longSMS ) !
- List of numbers
Set the telephone number of the recipient of your messages. Click on the icon on the right to connect the phone number with the customer who has activated the trigger.
- Group name
Enter the name of a group, previously created in your customer account smsmode©and containing the destination numbers.
- Sending date
- Sender (SenderID)
Set the custom transmitter to be displayed instead of the default short code.
ATTENTION: this custom transmitter must contain a maximum of 11 characters, with no special characters or spaces!
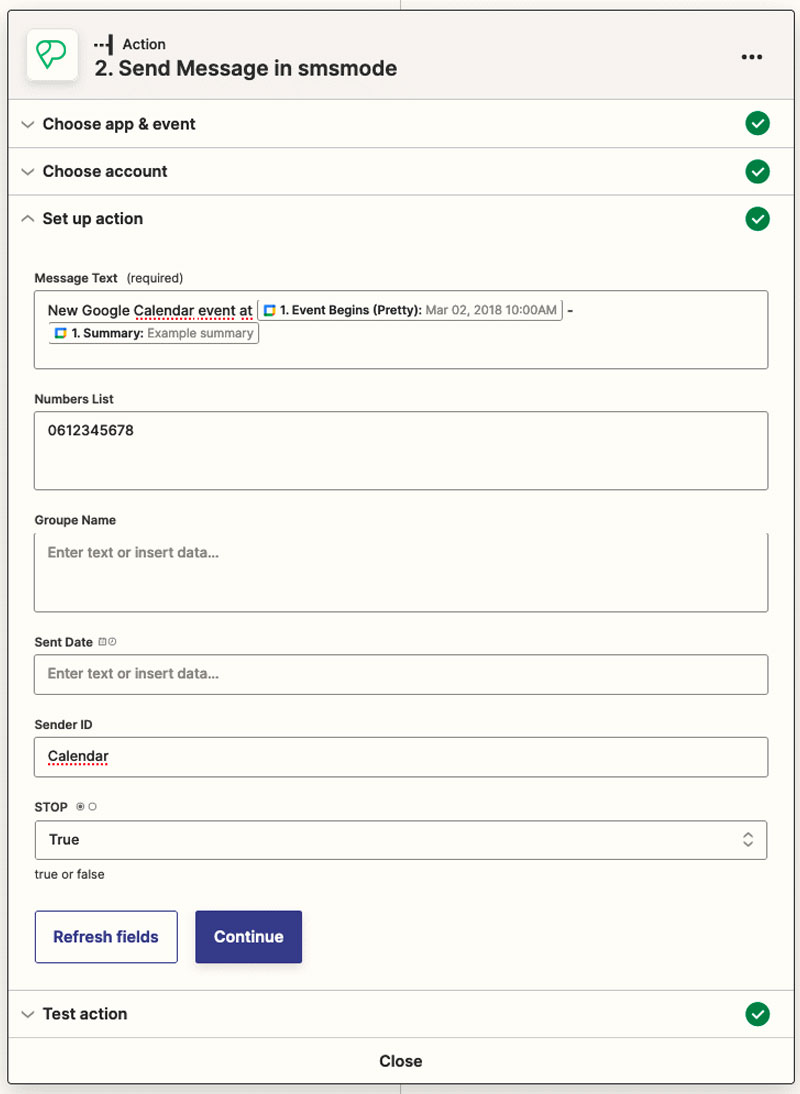
When editing, you can use the dynamic elements linked to the action.
For example, in the case of Google Calendar, the following elements are available:

Test the "Send message" action you've just set up.
Confirm with "Publish and turn On".
Finalize your Zap by naming it and activating it (On/Off button).

Congratulations!
Your Zap is now operational, and you'll receive an SMS 15 minutes before each calendar event (if you've configured your trigger this way).
You can deactivate your trigger at any time by clicking on the "On/Off" switch in the Zap list.
Optional :
Setting up complex Zaps
You can create custom and complex scenarios with Zapier including:
Creating scenarios in several stages
So, after sending an SMS, you can program a new action, such as sending an email, sending a second SMS or any other action.
Simply edit the Zap and click on the (+) at the end of the Zap to add an action.
Setting a filter between the two Zap steps
The filter function allows you to decide whether or not to continue with the Next Zap steps , according to various criteria.
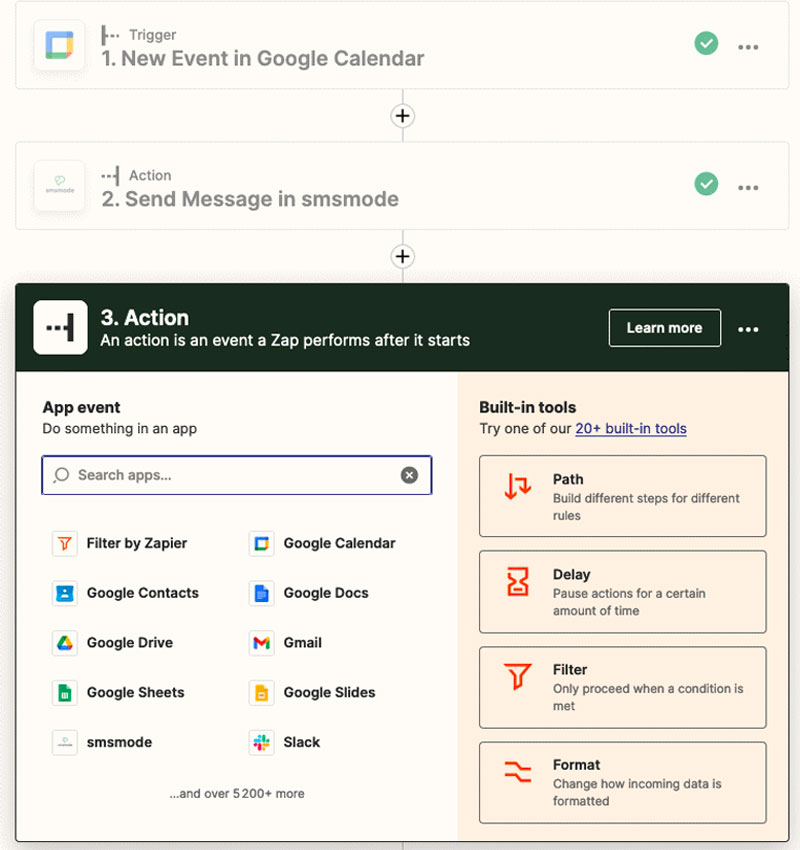
This allows you to set conditions.
With this configuration, for example, zap will only continue if the calendar event is "Christmas".

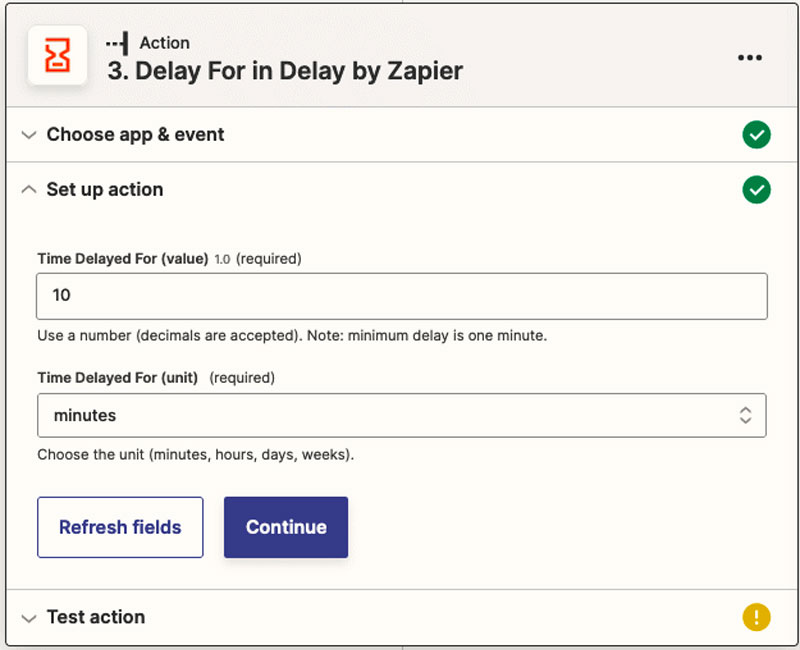
Setting an action between the two Zap steps
This option, to be chosen from among the twenty or so options offered by Zapier, lets you set a time interval (Delay) before the next action.

To find all the options offered by Zapier, click on the link :
You will find the complete list of these actions.
Create your free account
Try out our SMS platform and benefit from 20 free test credits, with no obligation.